Do you want to bring a unique twist to your home decor?
A rustic herringbone wood wall could be the perfect solution to elevate your space.
This article will guide you through the steps of adding a herringbone pattern that embodies a rustic aesthetic.
What is a Rustic Herringbone Wood Wall?
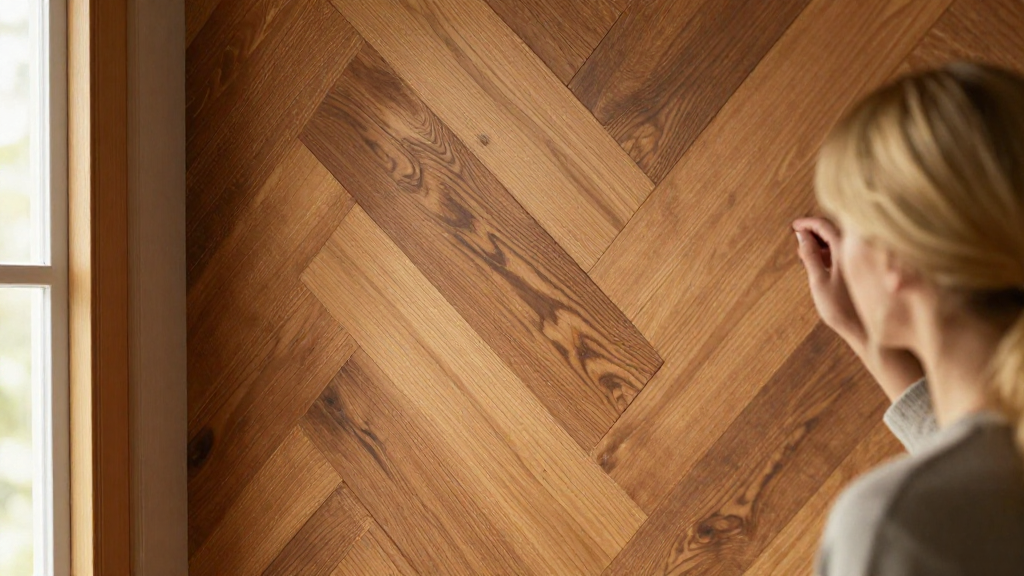
A rustic herringbone wood wall is a stunning feature made by arranging wood planks or panels in a diagonal zigzag pattern.
The herringbone design is a classic that works well with various styles, but when combined with rustic wood, it creates a warm and inviting atmosphere.
Why Choose a Rustic Herringbone Wood Wall?
-
Timeless Elegance:
The herringbone pattern has been a favorite among architects and designers for centuries.
Its geometric design offers a sophisticated look that remains in style. -
Natural Texture:
Using wood adds texture and warmth to your home.
The rustic finish enhances the natural characteristics of the wood, such as knots and grains. -
Versatile Décor:
Whether your home is modern, industrial, or traditionally rustic, a herringbone wood wall can adapt to any decor style.
This versatility makes it a popular choice among homeowners. -
Easy to Customize:
You can choose different wood types, finishes, and colors to create a unique rustic herringbone wood wall that reflects your taste.
How Do You Prepare for a Rustic Herringbone Wood Wall Project?
Preparation is key to successfully adding a rustic herringbone wood wall.
Here’s how you can set yourself up for success:
1. Select Your Wood:
Consider using reclaimed wood for an authentic rustic look.
Common options include:
- Oak
- Pine
- Cedar
- Barn wood
Ensure that your wood is properly treated and free from any pests.
2. Gather Your Tools:
You will need the following tools for installation:
- Measuring tape
- Level
- Miter saw or hand saw
- Nail gun or hammer
- Wood adhesive
- Sandpaper
- Safety goggles and mask
3. Decide on a Layout:
Sketch out your proposed layout or use software to visualize how the herringbone pattern will look.
Ensure you estimate the quantity of wood needed based on your wall’s dimensions.
How Do You Install a Rustic Herringbone Wood Wall?
Once your preparations are complete, it’s time to start your project.
Here are the detailed steps for a successful installation:
1. Measure and Mark the Wall:
- Find the center of the wall: Measure your wall and mark the center point.
- Draw a reference line: Using a level, draw a straight line vertically from the center point down to the floor.
This line will help you keep the pattern aligned.
2. Cut Your Wood:
- Cut your wood into planks for the herringbone pattern using your miter saw.
- Each piece should be of equal length to maintain uniformity throughout the installation.
3. Start with the Center:
- Position your first piece of wood at the center of the wall against the reference line.
- Ensure it is level and secure it with wood adhesive and nails.
4. Continue the Pattern:
- Move on to the second piece, placing it at a 45-degree angle against the first piece to create the herringbone effect.
- Repeat this process, working outward from the center until your wall is fully covered in rustic charm.
How to Finish Your Rustic Herringbone Wood Wall?
After installing the wood, the last step is to add the finishing touches that will enhance the rustic look.
Consider these options:
-
Sanding:
Use sandpaper to smooth out any rough edges or surfaces.
This will prevent splinters while enhancing the aesthetic of the wood grains. -
Staining or Sealing:
If you wish to enhance the wood color, apply a natural stain.
A clear sealer can protect the wood from moisture and wear. -
Decorative Touches:
– Consider adding rustic decor items such as:- Vintage frames
- Wall sconces
- Nature-inspired artwork
These details will tie the entire look together.
Why Choose DIY?
Opting for a DIY rustic herringbone wood wall project can be rewarding.
-
Cost-Effective:
Hiring a professional can be expensive, but doing it yourself saves money. -
Personal Satisfaction:
Completing a project with your own hands brings a sense of achievement.
Plus, you’ll have a story to share with family and friends about your custom wall. -
Creative Freedom:
You have complete control over design elements, allowing you to reflect your individual style.
Are There Any Alternative Options?
If a rustic herringbone wood wall seems like too big of a project, consider these alternatives:
-
Stick-On Tiles:
Many companies offer peel-and-stick herringbone wood wall tiles that are perfect for a quick installation. -
Accent Art:
Instead of a full wall, create a herringbone accent around a fireplace or a focal point. -
Mix Materials:
Combine wood with other materials like metal or stone for a mixed media approach to the herringbone design.
Final Thoughts
Adding a rustic herringbone wood wall can transform your space.
With some preparation, the right tools, and creativity, you can create a stunning feature that enhances the charm of your home.
Embrace the beauty of rustic wood and let your interior design speak volumes about your unique style.
So, are you ready to dive into your next DIY project?