Why You’ll Love this American Kitchen Classic Red Velvet Cake Recipe
If you’ve ever tasted a slice of red velvet cake, you know why it’s a beloved classic in American kitchens. The vibrant red hue and velvety texture draw you in, but it’s the perfect balance of flavors that keeps you coming back for more.
I love how this cake feels celebratory, making it ideal for birthdays or special occasions. The subtle cocoa undertone adds depth, while the creamy frosting elevates each bite to pure bliss.
Plus, it’s surprisingly easy to make, turning even novice bakers into kitchen heroes. When I share this cake with friends and family, their smiles say it all.
Trust me, once you’ve tried it, you’ll understand why red velvet is a timeless favorite.
Ingredients of American Kitchen Classic Red Velvet Cake
When it comes to baking a classic red velvet cake, the magic truly starts with the ingredients. Each component adds its own special touch, creating that signature flavor and texture that makes this cake so memorable. From the rich cocoa powder to the vibrant red food coloring, every item on this list plays a crucial role.
So, let’s gather what you’ll need, and get ready to plunge into a baking adventure that will have you smiling with each delicious slice.
Ingredients:
- 16 tablespoons unsalted butter, softened (plus more for pans)
- 2 1/2 cups cake flour, sifted (plus more for pans)
- 2 tablespoons Dutch-processed cocoa powder, sifted
- 1 tablespoon baking powder
- 1 teaspoon kosher salt
- 1 cup buttermilk
- 2 tablespoons red food coloring
- 1 tablespoon white vinegar
- 1 teaspoon vanilla extract
- 1 1/2 cups sugar
- 2 eggs
For the frosting:
- 1/3 cup flour
- 1 1/2 cups milk
- 1 1/2 cups unsalted butter, softened
- 2 teaspoons vanilla extract
Now, let’s chat about these ingredients for a second. The butter is your best friend here, bringing that lovely moisture and rich flavor to the cake.
And speaking of moisture, don’t skimp on the buttermilk—it adds that delightful tang that balances the sweetness perfectly. If you’re feeling adventurous, try using different food coloring to see how it changes the vibe of the cake. Just remember, the more vivid the color, the more vibrant your cake will be.
Oh, and one last tip: make certain to sift your dry ingredients. It can seem like an extra step, but it guarantees a light, fluffy cake without any pesky lumps. Trust me, your future self will thank you when you’re devouring that first slice.
How to Make American Kitchen Classic Red Velvet Cake
Making the American Kitchen Classic Red Velvet Cake is like stepping into a cozy kitchen filled with the warm aroma of baking. To get started, preheat that oven of yours to 350 degrees F. While it’s warming up, grab two 8-inch cake pans and give them a nice coating of butter and a sprinkle of flour. This little step is essential; we don’t want our beautiful cakes to stick.
In a bowl, whisk together 2 1/2 cups of sifted cake flour, 2 tablespoons of Dutch-processed cocoa powder, 1 tablespoon of baking powder, and 1 teaspoon of kosher salt. This dry mixture is the backbone of your cake, so make sure to give it some good whisking.
Now, let’s mix the wet ingredients. In another bowl, combine 1 cup of buttermilk, 2 tablespoons of red food coloring, 1 tablespoon of white vinegar, and 1 teaspoon of vanilla extract. This vibrant mixture is where the magic happens; it’s what gives our cake that iconic color.
In the bowl of a stand mixer, beat 16 tablespoons of softened unsalted butter with 1 1/2 cups of sugar on medium-high speed until it’s light and fluffy—think clouds, but tastier. Add in 2 eggs, one at a time, mixing well after each addition.
Then, it’s time to combine the dry and wet ingredients. On low speed, alternate adding the dry mix in three parts and the wet mix in two, finishing with the dry. You’ll want to mix just until smooth—overmixing is the enemy of fluffiness.
Once your batter is ready, divide it evenly between the prepared pans and smooth the tops. Give those pans a gentle tap on the counter to release any air bubbles (trust me, it makes a difference). Slide them into your preheated oven and bake for about 30 minutes, or until a toothpick inserted into the center comes out clean.
After that, let them cool in the pans for about 20 minutes before transferring to wire racks. While your cakes cool, you can whip up the frosting. In a saucepan, whisk together 1/3 cup of flour and 1 1/2 cups of milk, cooking it over medium-high heat until thickened.
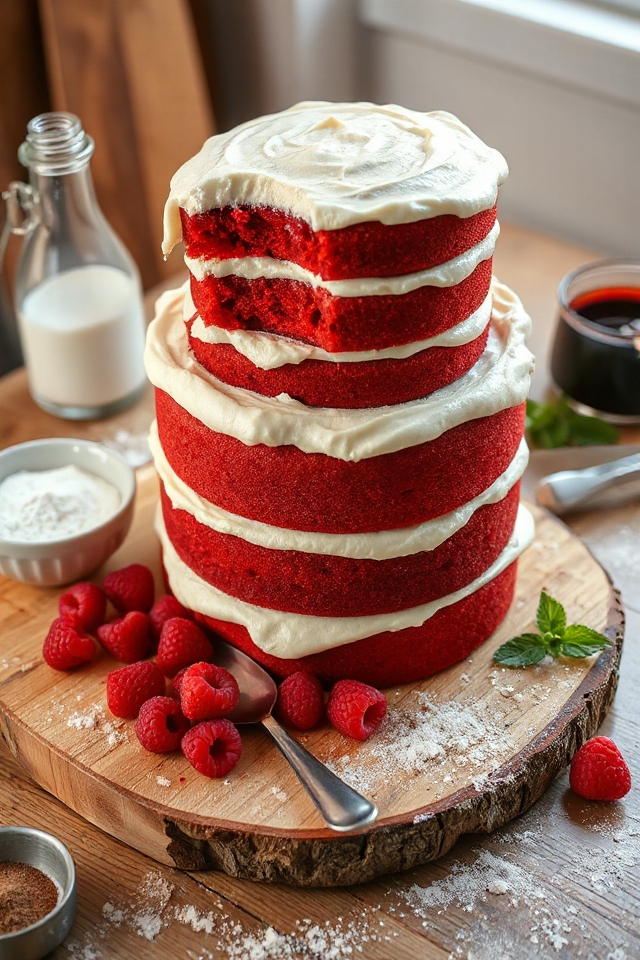
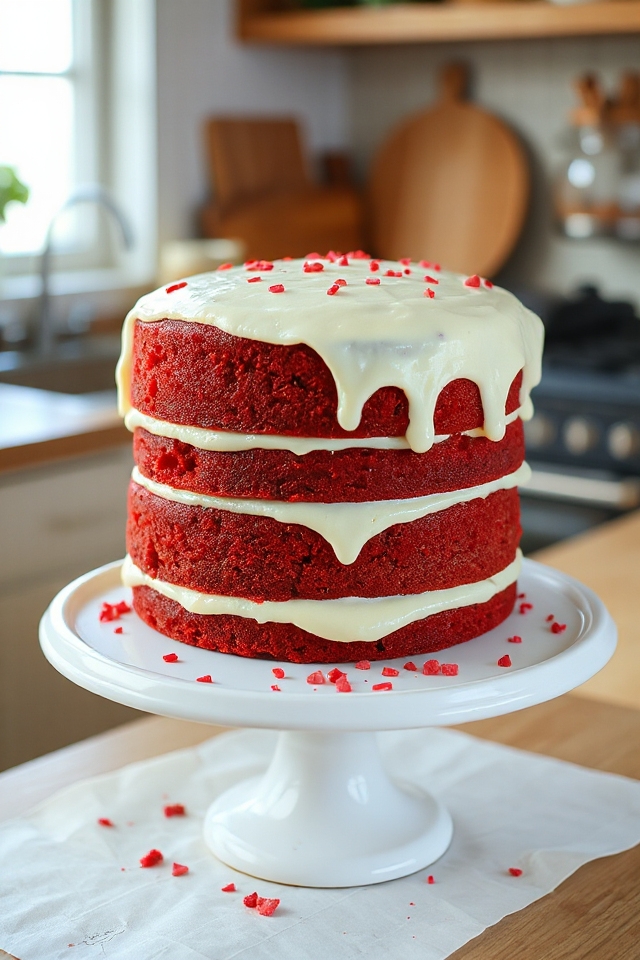
Once cooled, combine this mixture with 1 1/2 cups of softened butter and 2 teaspoons of vanilla extract in your stand mixer, beating until fluffy. Once your cakes are completely cool, stack them with a generous layer of frosting in between and around.
Let it chill, and then, finally, slice into it and enjoy. Trust me, one slice is never enough.
American Kitchen Classic Red Velvet Cake Substitutions & Variations
While I love the classic red velvet cake, there are plenty of substitutions and variations you can try to make it your own.
For a healthier twist, you can swap out some of the all-purpose flour for whole wheat or almond flour, adding a nutty flavor. If you’re dairy-free, use almond milk or coconut milk instead of buttermilk, and replace the butter with a plant-based alternative.
Want to spice things up? Add a teaspoon of cinnamon or nutmeg to the batter. You can also experiment with different frostings; cream cheese frosting is a classic, but a chocolate ganache or whipped coconut cream can give it a unique touch.
Enjoy making this cake truly yours!
What to Serve with American Kitchen Classic Red Velvet Cake
After customizing your red velvet cake with some delightful substitutions, you might be wondering what to pair it with for the perfect serving experience.
Personally, I love serving it with a side of fresh berries, like raspberries or strawberries, to balance the sweetness. A scoop of vanilla ice cream adds a creamy contrast that’s simply irresistible.
If you’re feeling adventurous, a drizzle of chocolate sauce or a dollop of whipped cream can elevate each slice.
For drinks, a rich coffee or a glass of cold milk complements the cake beautifully.
With these pairings, your red velvet cake won’t only shine on its own but also create a memorable experience for you and your guests!
Additional Tips & Notes
To guarantee your red velvet cake turns out perfectly, keep a few key tips in mind. First, make sure your ingredients are at room temperature; this helps the batter mix more evenly.
When measuring flour, spoon it into the cup and level it off—don’t scoot the cup into the flour, as this packs it down.
Also, don’t skip the chilling step after frosting; it helps the layers set beautifully.
Finally, use high-quality cocoa powder for the best flavor and color contrast. If you want a richer taste, consider adding a splash of espresso to the batter.
Trust me, these little tweaks make a big difference in achieving that decadent, velvety texture everyone loves! Enjoy baking!